|
Setup steps must be completed before using this
software. This is only a rough outline for running a net, and may vary greatly
from your net procedures.
- Starting a Net.
- Taking check-ins.
- Making assignments.
- Entering notes.
- Closing the net.
- Printing Net report.
1. Starting a Net.
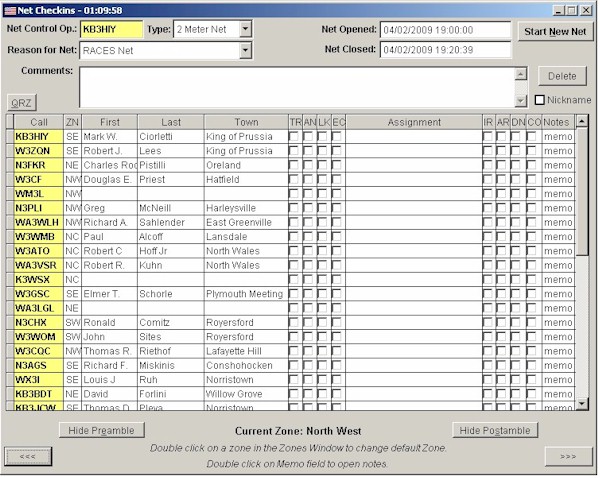
From the Quick Start menu select "Check-ins-Start/Modify a
Net", and click OK. The Net Check-ins screen and Zones screen appear
automatically and defaults to the last net run. Click on Start New Net button.
Your call sign should automatically fill, if you set it in the Default Settings.
Select a Net Type (Fig. 1) and Reason for Net (Fig. 2).
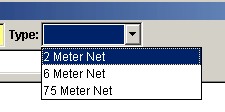
Fig. 1 |
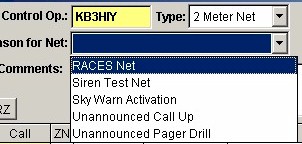
Fig. 2 |
Checking the Nickname box will display the
Nickname from the Roster as opposed to the First name. If your net has a
preamble, click on Show Preamble and start the net. Enter call signs for any who
have announcements or traffic. Click the appropriate check box for each call
with traffic, announcements, on a link, and/or early check in. Or you may
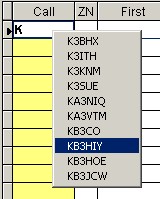
enter checkins by right clicking in the Call column (Fig. 3). This will display
a list of stations
in the current default zone contain in the Roster. Entering a partial call sign
will limit the list further. Changing default zone will change the list. See
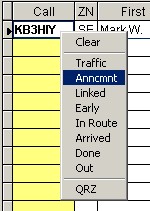
Taking checkins by zone. If the field contains a complete call sign a Clear,
Traffic, Anncmnt, Linked, Early, In Route, Arrived, Done, Out, QRZ is displayed
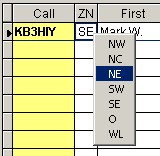
(Fig. 4). You can change the zone for a station by typing the new zones code or
by right clinking on the ZN column (Fig. 5) This will display the complete list
of zones. This is handy for mobile and roaming stations who check in from
outside default zone
2. Taking check-ins by zone.
RACES Logger automatically defaults to the first defined
Zone. If you wish to start with a different Zone, double click the Zone you want
in the Zones window (Fig. 6). This changes the default Zone and is indicated at
both the bottom of the Zones and Net Checkins windows. Call for and record
check-ins for the current zone in the Net Checkins window. When you are ready to
move to the next Zone, double click the next zone of your choice in the Zones
window. Repeat until you have cycled through all of your zones.
You may leave blank rows, as markers to distinguish between groups of check-ins.
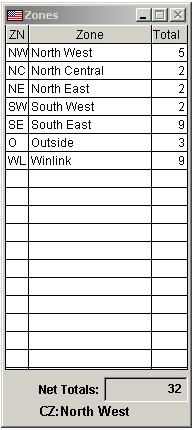
Fig. 6
3. Making assignments.
If your nets include giving out assignments and you have
created default assignments in Net Reasons, they will be automatically entered
when the stations check in. You may change the default assignment by Right clicking
the assignment field (Fig. 7). A list of current net assignments defined for the
Reason for Net will be displayed or you can manual enter a assignment. As the assignments are completed, check
them off in the DN column. Check-ins with completed assignments are highlighted
in blue.
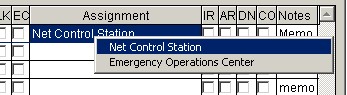
Fig. 7
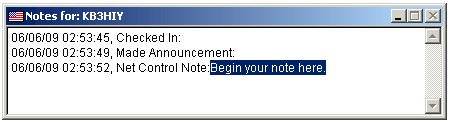
4. Entering notes.
As you run your net some basic notes will be
automatically entered. For example, checkin time, and made announcement. You can enter
custom notes for individual check-ins by double
clicking the word Memo in the notes column. You can leave this window open and
position it off to one side and display notes as you go along with the Net.
Double clicking in the notes window will append a Date and Time Stamp to any
existing notes and highlight the area to place your note.
5. Closing the net.
If your net has a post amble, click on Show
Postamble button to display and read. When completed simply click in the Net
Closed field in the Net Checkins window to auto-completed the field with
the current date and time. Your ready to print the Net report.
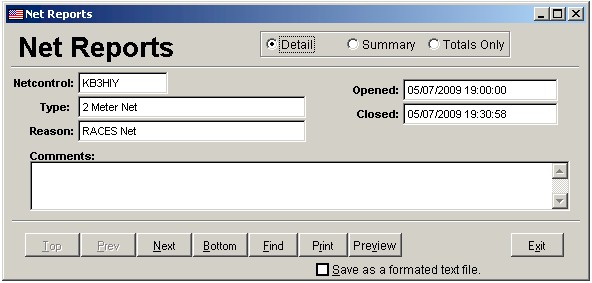
6. Printing Net report.
Close the Net Checkins window and go to File menu on the
main RACES Logger window. Select Quick Start to redisplay the dialog box.
Highlight Print Net Reports and click open. Select the completed net and choose Preview or Print. To print a report to a text file, check Save
to formatted text file. Your report will be generated and saved to the file NETREPORT.TXT in your RACESLogger directory.
You can create three types of reports, detail, summary, and a totals only
report.
|